

Every one of us likes a little greenery in the house, doesn't it? Plants require very low maintenance and can be left for several days without supervision, but due to the lack of moisture in the soil, our long trips for more than a week or two may be harmful to the health of the plants. In this case, plants may wilt or wilt due to lack of proper watering. To solve this problem, in this article, we will use the Arduino Uno development board to make an automatic irrigation system, which will automatically irrigate your plants and keep them healthy, even if you leave the town for weeks or months. In this article, the humidity sensor will be used to track the optimal humidity value of the plants.
Working process of automatic irrigation system
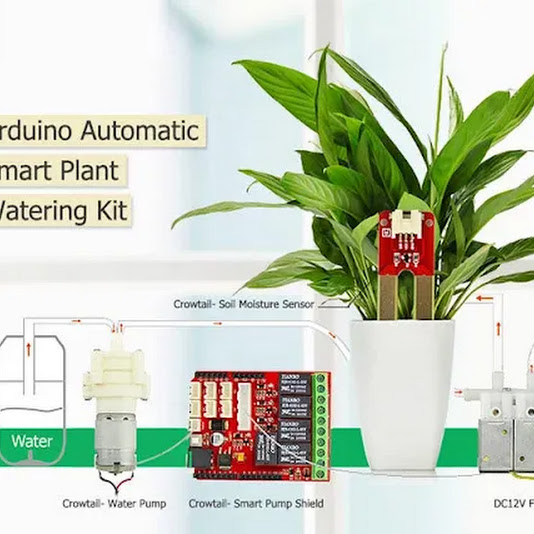
The logic of this system is very simple. In this system, the humidity sensor detects the humidity value of the soil. When the sensor detects a low humidity value, it will automatically switch the water pump and irrigate the plants with the help of the microcontroller. After sufficient water is supplied, the soil retains moisture, and then the pump is automatically stopped.

The working principle of the soil moisture sensor is easy to understand. It has 2 probes with exposed contacts, which act like a variable resistor, and its resistance changes according to the water content in the soil. This resistance is inversely proportional to soil moisture, which means that the higher the water content in the soil, the better the conductivity, and therefore the lower the resistance. The less water in the soil, it means that the conductivity is poor and the resistance is greater. The sensor generates an analog voltage output based on the resistance.
The sensor comes with an electronic module to connect the probe to the Arduino. The module has an LM393 high-precision comparator, which can convert analog signals into digital outputs and then feed them to the microcontroller.

We need a small pump to irrigate the plants. Depending on the size of the garden, it can provide more water and cannot be powered by Arduino directly. Therefore, if you need to operate a larger pump, you need a driver to provide enough current for the pump. I used a 5v relay. You can also use AC powered pumps and use suitable relays. The working principle will be the same as shown in this article, you only need to replace the DC power input connected to the relay with an AC power input, and you must use a separate DC power supply to power your Arduino.
Required components
This article requires few components and simple connections. These components are listed below:
● Arduino UNO development board
● Humidity sensor
● 5V relay module
● 6V mini water pump
● Connection line
● 5V battery

Arduino automatic irrigation system circuit diagram
The complete circuit diagram of the Arduino automatic irrigation system is shown below:

In this section, I will explain all the details with the help of schematic diagrams. Arduino UNO is the brain of the whole project. It controls the electric pump based on the moisture in the soil given by the moisture sensor.
To power the circuit, I used an external battery. You can use 9-volt or 12-volt batteries. The battery is connected to the Vin and ground pins of the Arduino, and we can also connect the motor to the battery through a relay. The humidity sensor output is connected to the analog pin of the Arduino. Remember to use the 5 volt pin of the Arduino to power the sensor and relay modules.
Assemble automatic irrigation system
We first connect the relay to the Arduino development board. Connect the VCC of the relay module to the 5V pin of the Arduino, and connect the ground of the relay to the ground of the Arduino. Now connect the relay signal pin to any digital pin of the Arduino (except pin 13). Here I connect it to pin 3 as shown in the figure below.

The next step is to connect the soil moisture sensor to the Arduino. Connect the VCC and ground of the sensor to the 5V and ground pins of the Arduino, respectively. The analog output of the sensor is connected to any analog pin of Arduino, here I connect it to pin A0.
Finally, connect the pump to the relay module. A relay module has 3 connection points, which are common point, normally closed point and normally open point. We need to connect the positive terminal of the pump to the common terminal and connect the normally open pin to the positive terminal of the battery. Next is to connect the ground of the pump to the ground of the Arduino, and finally connect the small hose to the water pump.

Now connect the battery to the circuit, if the pump starts working, then your circuit is fine. Now let's upload the code to the Arduino.
Automatic irrigation system code description
For this project, we did not use any libraries, we just used the basic functions of programming. The code is very simple and easy to use. The explanation is as follows.
We first define all the necessary integer variables. Here I use two integer variables to store the soil moisture value and the converted moisture percentage.
Then, I defined the pin mode, where I used pin 3 as the output, and then initialized the serial monitor for debugging.
In the loop() function, first read the value of soil moisture. Use the analogRead() function of Arduino to read the soil moisture and store it in soilMoistureValue . The value varies from 0 to 1023.
In the code below, the map() function is used to convert the sensor value to a value of 0-100%. This means that if the soil is dry, the output moisture percentage is 0%, and if the soil is very wet, the moisture percentage is 100%.
Calibrate our humidity sensor
In the map function, we need to assign a dry value and a wet value. For this, we need to monitor these values. You can use the following code to read the value:
Upload the above code to Arduino and open the serial monitor. Then place the soil moisture sensor in dry soil or place the sensor in the air and read the value. Now replace this value with 490 (the second item of the mapping function).
The next step is to place the sensor in moist soil or immerse it in water, then read the value and assign it instead of 1023. These values will calibrate your sensor correctly for better results.

After converting these values, we can control the pump based on the percentage of soil moisture. If the moisture percentage is lower than 10, then the Arduino will turn pin 3 to low, the pump will be turned on and the Arduino will output a message in the serial monitor.
When the moisture percentage exceeds 80% (indicating that the soil is full of water), Arduino will turn off the pump and print out "pump off" on the serial monitor.
Testing the automatic irrigation system
After uploading the code to the Arduino, put the entire circuit except the pump and sensor probe in a plastic box, as shown in the figure below.

Now put the humidity sensor in the soil. Place the sensor as close as possible to the root of the plant to obtain higher accuracy.

The last step is to put the motor in a container full of water, when you are away, the automatic irrigation system is ready to take care of your lovely plants.

You may need to change the moisture percentage to start and stop the pump, because different plants have different water needs. I hope you like this project and are ready to use Arduino to make your own automatic irrigation system. If you have any questions, you can always reply below this post.


![[Arduino FreeRTOS tutorial] How to use semaphore and mutex](https://blogger.googleusercontent.com/img/a/AVvXsEjv4nInC0gGae_exqVbGJ3vHTe70Mt_3Tc2OTotIjgVpf3BPNJnmGYrvEYBxF3gUiDNfJl5IHSd-2ShuRFe7cR5AtsimzD6NZtmfCz-NNV1rLmvK3mw1yGjlMYCthIAOm3lz_vY7CTygjfPdmdR6fWtLJomA46NJOD8HGVMzLPK2mF9I9eE3VsJbQI=w72-h72-p-k-no-nu)


No comments:
Comments